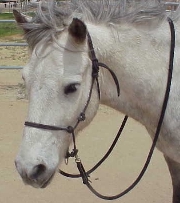
The advantage to using a thin rope on a horse is that it gives good
control over a horse. The halter is light and comfortable while the horse
is behaving but the thinness of the rope gives it some bite when the horse
pulls. I find that it is better than a stud chain because it gives some
control over the horse but is less likely to make a horse angry than a stud
chain. The thin rope may look weak but it is a heck of a lot stonger than
your arms and the horse is less likely to pull because it hurts the horse
if he pulls. It is best used with a 12 foot lead rope for more leverage.
I have used these rope halters for the past year and have had no problems
with them.
Caution:
Do not leave any halter on a loose horse.
This halter may break if a horse is tied up with it.
This halter may cut if a horse fights it.
Not recommended for tying a horse in a trailer.
Not responsible for misuse of halter.
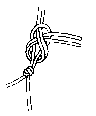
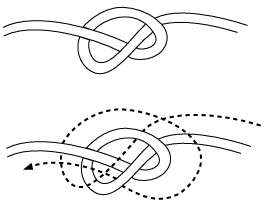
TIE KNOT 1
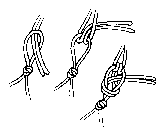
TIE KNOT 2 (easier to loosen)
Time
Time it took me to figure out how to tie this rope halter - 2 weeks. Money
saved - minus \\$1000.
Time it takes me to tie a rope halter now - less than 15 minutes. Money
saved - \\$20.
Time it will take you to learn from these instructions - Plus or minus 40
hours. Money saved - minus \\$1000. Money saved on all subsequent halters
- \\$20 each.
Time it takes to tie a rope halter with a puppy helping you tighten the
knots - 3 hours.
Materials needed
20 feet of 1/4 inch polyester rope. Matches to melt and seal the ends of
rope (or to burn these instructions if you get frustrated).
Note
These directions are for an adult horse with a small head. I use 18 feet
of rope but you may need more for a bigger head. If you get confused it
is best to untie all knots and start over.
Directions
Tie simple knots at the distances shown below. Measurements are from knot
to knot and do not include knot. Make the knots firm but not tight because
you will be bringing the rope back around to tie into those knots. The last
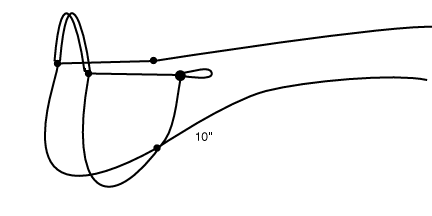
knot in about the middle of the rope is a knot with a loop for the tie loop
of the halter. After you tie the tie loop you go back and tie into the knots
you have already tied.
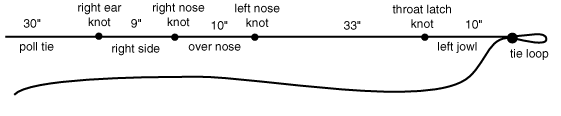
To tie into a knot, loosen knot and tie into knot following rope path.
Tie into the left nose knot first. Then then right nose knot to make a double
rope over the nose.
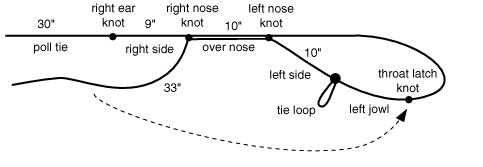
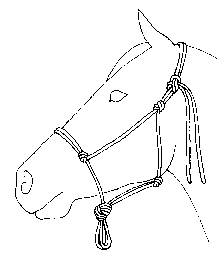
Tie into the throat latch knot. Arrange halter as shown so it makes sense.
And tie into the right ear knot.
Gather the two 33" sections and tie a big ugly knot at the chin. Test
all knots before putting halter on horse. If halter falls apart, knots are
not tied correctly. Untie all knots and start over.
Slip knots to adjust size of halter. Trim tie ends the same length and melt
them with a match to seal the ends. I don't attach the two ends together.
© 1995 Connie Nygard
These instructions may be given away but not sold.
Halter notes: Materials-- 1/4 or 5/16 yacht braid independently
suggested as an alternative material for making halters.
Source for Yacht Braid
ParaCord
Rope Halter with Rings
Can be purchased from Connie Ouim.
Halter and Lead from Hay Strings
Main
Page